In Version 3.x
If there is an error to analyze, the support team may ask you to request the ReqIF Manager Job Log of their faulty job to understand your problem. In this case, proceed as follows:
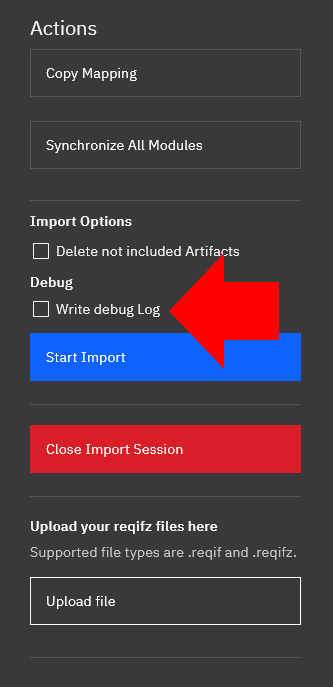
- To get a complete job log, select the Write debug log if errors occur check box before restarting the job. You can find this checkbox above next to the Start Import button or the Export button.
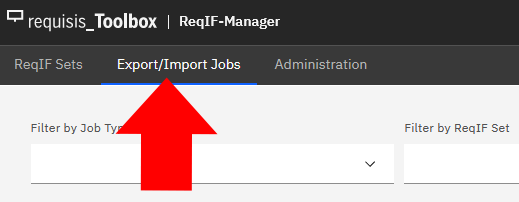
- In the navigation pane at the top of the screen, click Export/Import Jobs.
- Navigate to the corresponding job. Use the filter functions at the top of the screen to find the job you are looking for more quickly.
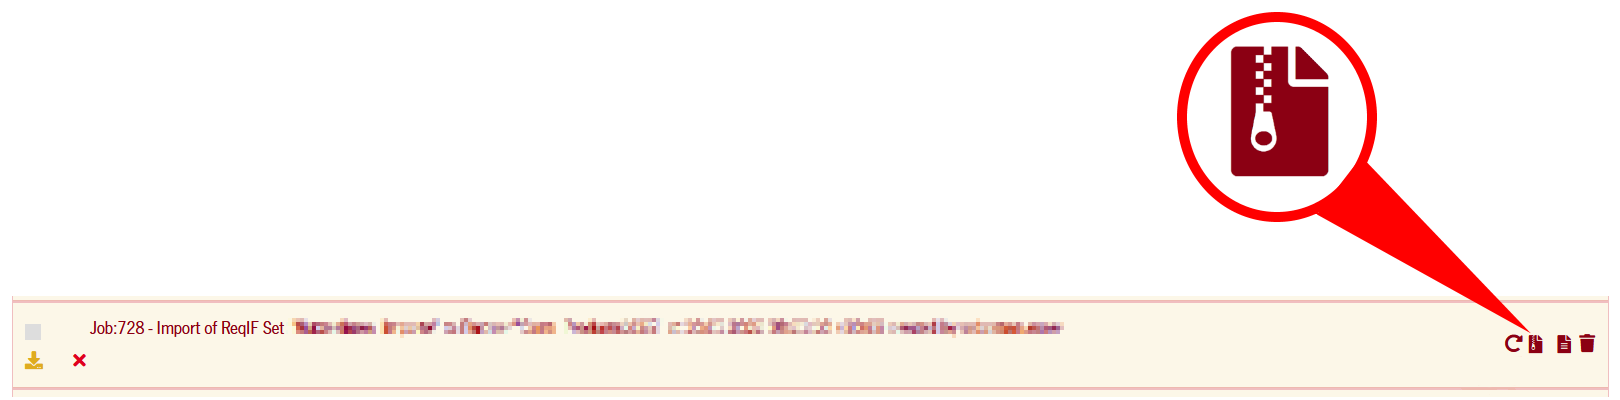
- When you find the job you are looking for, click the Download Job Logs icon on the right side of the screen.

- By clicking you will receive a zip file with the name job_logs_<Job ID>.zip which you can then add to your support ticket. The file contains the job log which corresponds to a documentation of the job as well as a separate module log for each module artifact. If you have downloaded a job log with an active debug log, the job log also contains a communication log which documents the interactions of the ReqIF Manager with the DNG server.
In Version 2.x
If there is an error to analyze, the support team may ask you to request the ReqIF Manager Job Log of their faulty job to understand your problem. In this case, proceed as follows:
- For a complete job log, check the Debug Log checkbox in case of errors before running the job again. You will find this checkbox to the left of the Start Import Job button or the Export button.

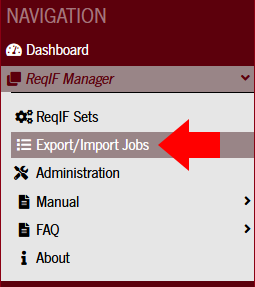
- In the navigation pane on the left side of the screen, click Export/Import Jobs.
- Navigate to the appropriate job. Use the filter functions at the top of the screen to find the job you are looking for faster.
- When you have found the job you are looking for, click on the Download Job Logs icon on the right side of the screen.
- By clicking you will get a zip file named job_logs_<job ID>.zip you can then add this to your support ticket. The file contains the job log which corresponds to a documentation of the job as well as a separate module log for each module artifact. If you have downloaded a job log with an active debug log, the job log also contains a communication log that documents the interactions of the ReqIF Manager with the DNG server.
Für Version 3.x
Wenn ein Fehler zu analysieren ist, kann das Support-Team Sie bitten, die ReqIF Manager Job Log ihres fehlerhaften Jobs anzufordern, um Ihr Problem zu verstehen. Gehen Sie in diesem Fall wie folgt vor:
- Um ein vollständiges Job Log zu erhalten, aktivieren Sie das Kontrollkästchen Write debug Log, falls Fehler auftreten, bevor Sie den Job erneut starten. Sie finden dieses Kontrollkästchen über neben dem Button Start Import bzw. des Buttons Export.
- Im Navigationsbereich am oberen Bildschirmrand klicken Sie auf Export/Import Jobs.
- Navigieren Sie zum entsprechenden Job. Verwenden Sie die Filterfunktionen am oberen Bildschirmbereich um den gesuchten Job schneller zu finden.
- Wenn Sie den gesuchten Job gefunden haben klicken Sie am rechten Bildschirmrand auf das Download Job Logs Icon.
- Durch den Klick erhalten Sie eine Zip-Datei mit dem Namen job_logs_<Job ID>.zip diese können Sie dann Ihrem Supportticket hinzufügen. Die Datei beinhaltet das Job Log welches eine Dokumentation des Jobs entspricht sowie für jedes Modulartefakt einen eigenen Module Log. Falls Sie einen Job Log mit aktivem Debug Log heruntergeladen haben beinhaltet das Job Log auch noch einen Communication Log dieser dokumentiert die Interaktionen des ReqIF Managers mit dem DNG Server.
Für Version 2.x
Wenn ein Fehler zu analysieren ist, kann das Support-Team Sie bitten, die ReqIF Manager Job Log ihres fehlerhaften Jobs anzufordern, um Ihr Problem zu verstehen. Gehen Sie in diesem Fall wie folgt vor:
- Um ein vollständiges Job Log zu erhalten, aktivieren Sie das Kontrollkästchen Debug Log, falls Fehler auftreten, bevor Sie den Job erneut starten. Sie finden dieses Kontrollkästchen links neben dem Button Start Import Job bzw. des Buttons Export.
- Im Navigationsbereich am linken Bildschirmrand klicken Sie auf Export/Import Jobs.
- Navigieren Sie zum entsprechenden Job. Verwenden Sie die Filterfunktionen am oberen Bildschirmrand um den gesuchten Job schneller zu finden.
- Wenn Sie den gesuchten Job gefunden haben klicken Sie am rechten Bildschirmrand auf das Download Job Logs Icon.
- Durch den Klick erhalten Sie eine Zip-Datei mit dem Namen job_logs_<Job ID>.zip diese können Sie dann Ihrem Supportticket hinzufügen. Die Datei beinhaltet das Job Log welches eine Dokumentation des Jobs entspricht sowie für jedes Modulartefakt einen eigenen Module Log. Falls Sie einen Job Log mit aktivem Debug Log heruntergeladen haben beinhaltet das Job Log auch noch einen Communication Log dieser dokumentiert die Interaktionen des ReqIF Managers mit dem DNG Server.
Add Comment